Hello, aspiring broadcast audio engineers!
Welcome to the fascinating world of television sound. To shine in this role, mastering audio fundamentals is a must. Let’s delve into the basics of broadcast audio and how you can use it to craft an exceptional auditory experience.
Sound, in its essence, is the result of vibrations traveling through the air. These vibrations create waves that our ears translate into what we perceive as sound.
In the TV broadcast environment, we capture these sound waves using microphones, which convert them into electrical signals. A deep understanding of sound behaviour is essential for manipulating audio effectively, whether you’re working on a live news broadcast or a scripted show.
Sound levels are measured in decibels (dB), indicating how loud or soft a sound is.
In broadcasting, you’ll encounter a wide range of levels, from the subtle murmur of a whisper to the booming sounds of an explosion. Managing these levels is crucial for ensuring that the audio is both clear and impactful. For instance, during a live interview, you need to adjust the audio so that the speaker’s voice is prominent without overshadowing background sounds or causing distortion.
Frequency, measured in Hertz (Hz), refers to the pitch of a sound.
Higher frequencies correspond to higher pitches. Human hearing ranges from approximately 20 Hz to 20,000 Hz, but in broadcast, we typically focus on a more specific range tailored to our equipment and content needs. For example, you might adjust the frequency settings to ensure that the higher-pitched tones of a presenter’s voice are clear and crisp, while the low-frequency rumble of a distant helicopter is subdued but still audible.
In broadcast audio, we usually divide the audible spectrum into three main areas:
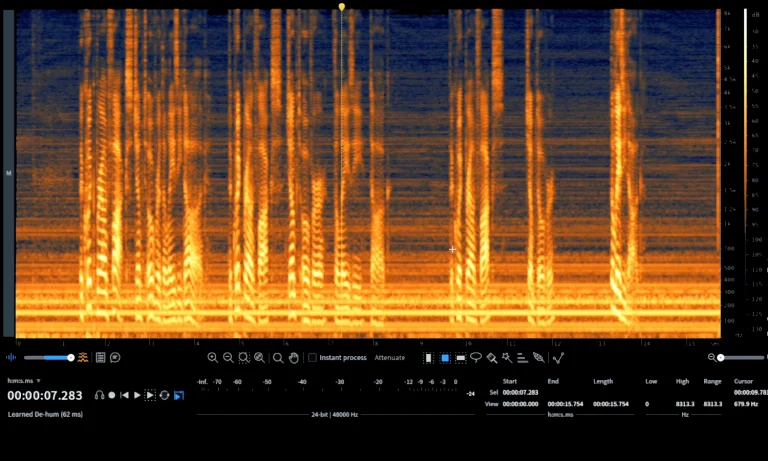
• Low Frequencies: These encompass the deeper sounds often associated with ambient noises or the weight of a scene. For instance, in a dramatic scene involving a thunderstorm, managing these frequencies helps in conveying the scene's intensity without overwhelming the dialogue.Waveforms offer a visual representation of audio signals, providing insight into their characteristics.
In a broadcast setting, examining waveforms helps you understand how loud or soft a sound is (amplitude) and the frequency content. For example, a waveform with sharp peaks might indicate a sudden loud sound, such as a clap, while smooth, consistent waves suggest steady audio, like a dialogue.


By analysing waveforms, you can make informed decisions about audio processing, ensuring that the sound levels are appropriate, and the audio maintains its intended quality.
While working as an audio engineer, you’ll quickly find out that certain presenters use their voice more dynamically to keep the attention of the audience. While it works well in a live scenario with an audience, it doesn’t always translate well for someone who is listening to the broadcast with headphones.
We aim for a smoother change of amplitude to ensure a consistent broadcast mix, using a multitude of tools that we’ll touch upon further. But first, let’s take a look at our essentials to capture our source as best as we can…
As an audio engineer, you will need the following equipment:
Microphones are the frontline tools for capturing audio in a broadcast setting. They play a crucial role in ensuring that the sound you transmit is clear and accurate. Here are the main types you’ll be working with:
• Dynamic Microphones: These microphones are robust and can handle high sound pressure levels (SPLs). They’re perfect for scenarios with loud environments, like managing the ambient noise on a busy street for a news reporter, or help with audience questions within a lively crowd. Their durability and versatility make them a staple in any broadcast setup.


Choosing the right microphone based on the environment and purpose is critical. For a bustling studio interview, a condenser mic is ideal, while a shotgun mic is better suited for capturing focused sound in a noisy setting.
For the audio engineer, your mixer serves as the central hub for managing multiple audio sources. It’s where you balance levels, apply effects, and direct audio to different destinations. Here’s what you need to master:
• Inputs and Outputs: Familiarise yourself with the various inputs and outputs on your mixer. Inputs might include microphone, line, and digital sources, while outputs could be for main broadcast, monitoring, or headphones. Knowing how to route audio effectively between these will ensure seamless integration of different sound sources.
A well-configured mixer is the backbone of any broadcast audio setup, providing you with the control you need to manage multiple audio elements effectively.
Your DAW is your digital workspace for recording, editing, mixing, and mastering audio. It’s where the audio engineer spends much of their time crafting the perfect sound for your broadcast. Key functions to master include:
• Recording: This is the process of capturing audio from microphones, line inputs, or digital sources. In a broadcast context, you’ll use recording features to capture interviews, voiceovers, and live audio for post-production.
DAWs offer a range of tools and features, so exploring and experimenting with them will help you discover their full potential and improve your audio production skills.
By understanding and mastering your equipment, you’ll be well-prepared to create exceptional audio for your broadcast projects. Practice with your gear, learn from each broadcast, and continually refine your skills. Remember, the key to success in broadcast audio engineering lies in your ability to adapt, experiment, and most importantly, listen carefully to the results of your work.
As an audio engineer, mastering microphone placement is a pivotal skill in our craft.
It’s the art and science of capturing pristine sound for television, whether it’s for an engaging interview, an exhilarating sports event, or a captivating documentary. Let’s explore the nuances of microphone placement and how to perfect your audio capture techniques.
In the world of broadcast audio, every recording environment presents its own set of challenges.
There isn’t a one-size-fits-all solution for microphone placement. Instead, success hinges on your ability to experiment and adjust based on the specific circumstances of each situation. Start with general guidelines, but be prepared to make modifications to suit the unique characteristics of your broadcast environment.
The proximity of the microphone to the sound source plays a crucial role in the quality of the recorded audio. Here’s how distance can impact your sound:
• Close Miking: Positioning the microphone a few inches from the sound source captures a more direct and intimate audio signal. This technique is particularly effective for interviews, voiceovers, and narration, where clarity and detail are paramount. For example, when recording a news anchor’s voice, placing the microphone close ensures that their voice is captured clearly without picking up unwanted background noise.Background noise is a frequent challenge in broadcast environments. Proper microphone placement is essential for minimising its impact:
• Directional Microphones: Using directional microphones, such as shotgun mics, helps focus on the sound source while rejecting off-axis noise. These microphones are designed to pick up sound primarily from one direction, making them ideal for isolating the desired audio from background distractions. For example, during a sports commentary, a shotgun microphone positioned close to the commentator will capture their voice clearly despite the surrounding crowd noise.Different broadcast scenarios require different microphone techniques:
• Interviews: For interviews, you can place shotgun mic(s) as close to the talent as possible without getting in the way of the cameras and lights. This is usually achieved by setting up a boom pole on a stand, above the talent. Lavalier microphones, which clip onto the speaker’s clothing, are also often used in interviews for hands-free operation, allowing the talent to move naturally without affecting audio quality.The acoustics of a room can greatly affect the sound you capture. As an audio engineer, understanding and adapting to room characteristics is crucial:
• Microphone Placement: Experiment with different microphone positions within the room to achieve the best balance between direct and reflected sound. For example, if a room has strong reflections, placing the microphone slightly off-centre may help reduce unwanted echoes.Ultimately, microphone placement is as much an art as it is a science.
Experienced audio engineers develop a keen ear for identifying the best microphone and placement for any given situation. Trust your instincts and continually experiment to refine your technique. Listening critically to the results of your microphone placement will guide you toward achieving the perfect sound for your broadcast.
By grasping these principles and practicing regularly, you’ll become adept at microphone placement and significantly enhance the audio quality of your broadcast productions. Remember, every recording environment is different, so stay flexible, remain attentive, and let your ear guide you toward capturing the best possible sound.
Gain staging involves setting appropriate levels at every stage of the audio signal path - from the microphone input to the final broadcast output. Proper gain staging is crucial to avoid distortion, maximise headroom, and ensure consistent audio quality. Think of it as managing the water flow in a pipe: too much pressure can cause leaks (distortion), while too little flow can lead to inefficiencies (inconsistent audio levels).
In practice, this means adjusting the gain on your audio mixer to ensure that audio levels are neither too high, causing clipping and distortion, nor too low, which might result in a weak signal. When set right, it’ll be a lot easier to process the source audio with tools such as equalisation and compression.
Noise and distortion are the adversaries of clear audio.
Noise might come from various sources, such as electrical hum from equipment, the buzz of air conditioning units, or even the rustle of audience members. Distortion occurs when audio signals are too strong, leading to unpleasant, harsh sounds. In a broadcast studio, you’ll need to employ effective noise reduction techniques and maintain careful level control to preserve the audio’s clarity and quality.
For instance, you might use noise gates to eliminate unwanted background noise during quiet moments or apply filters to remove electrical hum from your audio signals.
Ultimately, the human ear is the final judge of audio quality.
Our perception of sound can vary based on the listening environment, personal preferences, and the content’s context. As a broadcast audio engineer, developing a trained ear for balance, clarity, and impact is vital. This means tuning your audio not just for technical precision but also for how it resonates with viewers.
By understanding and applying these fundamental principles as an audio engineer, you’ll be well-prepared to tackle the challenges of broadcast audio.
So to build a strong foundation in audio engineering:
1. Understand the nuances of sound from sound levels to waveforms.By understanding and applying these fundamental principles as an audio engieer, you’ll be well-prepared to tackle the challenges of broadcast audio.
Remember, sound plays a crucial role in storytelling and audience engagement. Dive into the world of audio engineering with enthusiasm, experiment with different techniques, and let your ears guide you toward creating exceptional broadcast audio.
At Broadley Studios, we always work closely with our clients to make sure that everything sound and audio aligns seamlessly with your creative vision to produce the best possible film, video, TV programme, trailer, promo, live stream...
If you want any more information on our audio enginering and sound production or any info about shooting with us, please feel free to reach out to us and discover how we can help you and your production on +442077255858 or email us at [email protected].
The Broadley Team
Broadley Studios – For People With Something to say